- 易迪拓培训,专注于微波、射频、天线设计工程师的培养
CST2013: History Tree
录入:edatop.com 点击:
Navigation Tree: Components <Component Name><Solid Name>Properties
The history tree displays the history of the creation of the current shape.
As you can see, some entries in this list have a + or a – sign in front of them. If you click on these signs the tree will expand (for a + sign) or shrink (for a – sign).
Every entry in the history tree that has such a sign attached to it marks a point where another solid gets involved into the creation process. The items appearing when the tree is expanded show the history of the involved shape.
You can use the tree to edit the different shapes and their modifications that are used to complete the final solid. However, the history itself cannot be edited here. Therefore, you must use the History List.
There are two different types of History Trees, but their structures are similar:
The first type is shown in Example 1 and represents the new Fast Model Update. This means that when you edit a certain solid, the whole history is not processed to update the changed solid. Only the affected history blocks are executed. This saves time while editing a solid or any other part of the project.
The second type is shown in Example 2 and represents the old edit system. This means that the whole history is processed to update the changed solid. The second type is activated automatically if the History List contains an entry that is not known to the Fast Model Update. After the old system is active, the Curves Tree will also be reactivated. The new edit system handles curves in the same tree like solids.
What is the difference between the tree in Example 1 and Example 2?
In Example 1 the order of the shown items is such that the step that is carried out first is listed at last. The opposite behavior is shown in Example 2 where the step that is carried out first is listed at first. Another difference is that the parts in the tree that can be edited are written bold in Example 1. These are the parts for which the edit button is activated.
Edit...
The Edit button is active only for those items that can be edited.
Pressing the edit button for one selected action leads to the same dialog box that had appeared when doing this action during the solid construction. As soon as you close this dialog box after having changed something, the update starts, depending which one of the above named History Trees is activated.
Close
Closes this dialog box without performing any further action.
Help
Shows this help text.
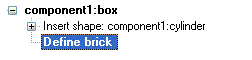
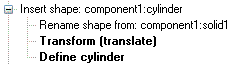
Example 1
The history list of a brick with an ex-centered pin.
|
|
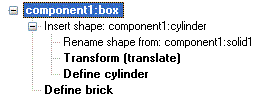
| The main history of the solid ”component1:box”
|
| The history of the solid ”component1:cylinder”
|
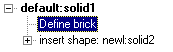
Example 2
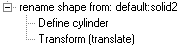
The history list of a brick with an ex-centered pin.
|
|

| The main history of the solid ”default:solid1”
|
| The history of the solid ”newl:solid2”
|
| The history of the solid ”default:solid2”
|

See also
History List, Curves Tree
CST微波工作室培训课程套装,专家讲解,视频教学,帮助您快速学习掌握CST设计应用
上一篇:CST2013: View Options - Line Width
下一篇:CST2013: Parameter List
CST培训课程推荐详情>>
 最全面、最专业的CST微波工作室视频培训课程,可以帮助您从零开始,全面系统学习CST的设计应用【More..】
频道总排行
- CST2013: Mesh Problem Handling
- CST2013: Field Source Overview
- CST2013: Discrete Port Overview
- CST2013: Sources and Boundary C
- CST2013: Multipin Port Overview
- CST2013: Farfield Overview
- CST2013: Waveguide Port
- CST2013: Frequency Domain Solver
- CST2013: Import ODB++ Files
- CST2013: Settings for Floquet B