- 易迪拓培训,专注于微波、射频、天线设计工程师的培养
CST2013: 2D/3D Plot Overview
录入:edatop.com 点击:
Compatibility Issues
If you experience any compatibility issues or graphics artefacts, please consider checking and updating your graphics driver version in the operating systems display settings. Alternatively, open the View Options dialog box, go to the Specials tab and change the acceleration mode to Basic or Software. If this still does not help, you may switch the engine mode to Legacy. Please report any issues and your settings to the CST support team.
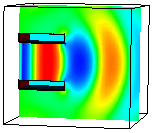
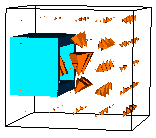
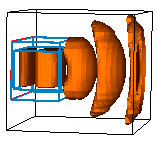
For examination of 2D and 3D results selected from the navigation tree, a highly interactive visualization engine is available for the most relevant result types. The short animation below shows the usage of the new interactive cutplane and color ramp widget.
Cutplane Widget
This interactive control element allows you to move and rotate the plane which is used either to clip your 3D plot or to define the plane for the 2D cross section plot through your 3D field. It vanishes automatically after you do not move your mouse for a second and it can be switched off in the cutplane options dialog using the "show help plane" switch. The cutplane and the widget can also be controlled using the x/y/z and arrow up/down keys.
Color Ramp
Here you can switch the scaling to logarithmic or dB when pointing the mouse on the title bar which displays the unit. Also you can influence the scaling by clicking on the tick numbers and moving them to a desired color, keeping the mouse key pressed, i.e. if your field is from 0 to 100 you can click on a value around 20 and move it to red. For the linear or dB case, this influences the clamping range, while for the logarithmic case it changes the log strength. The values can still be changed numerically in the plot properties dialog and its specials dialog. The color ramp can be moved by clicking its title bar.
The small black diamond shows the anchor point around which the scale can be zoomed when dragging the tick numbers. To move the anchor point click on the tick number besides it and drag the appearing red field to the desired position. The red field shows the new value for the anchor point during dragging.
Info Text
In the lower left corner there is a field containing some text information. Moving the mouse on this field may pop up some additional lines that are hidden in the mouse-away-mode. You can select or de-select lines for the mouse-away-mode by clicking on the eye symbol on the left of each line. The info text can be moved by clicking its title bar.
All transparent
Activate 2D/3D Plot: All Transparent to display all shapes transparent in 2D/3D plots.
A plot type specific plot properties dialog is accessible from the context menu.
Plot types
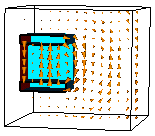 | 2D Vector Plot |
 | 2D Scalar Plot |
 | 3D Vector Plot |
 | 3D Scalar Plot |
To combine different plots, activate Navigation Tree: 2D/ 3D Results  <Result Plot> Overlay Multiple Plots. Select desired plots and add them to the plot list in Navigation Tree: 2D/ 3D Results <Result Plot> Result Plot List to customize the combined visualization. This feature is only available for the engine mode "legacy", see View: View Options Specials Field and mesh view settings Engine mode.
CST微波工作室培训课程套装,专家讲解,视频教学,帮助您快速学习掌握CST设计应用
上一篇:CST2013: Wizard / Archive Multiple Projects
下一篇:CST2013: Results / Recalculate S-Parameter with new Frequency Sampling
CST培训课程推荐详情>>
 最全面、最专业的CST微波工作室视频培训课程,可以帮助您从零开始,全面系统学习CST的设计应用【More..】
频道总排行
- CST2013: Mesh Problem Handling
- CST2013: Field Source Overview
- CST2013: Discrete Port Overview
- CST2013: Sources and Boundary C
- CST2013: Multipin Port Overview
- CST2013: Farfield Overview
- CST2013: Waveguide Port
- CST2013: Frequency Domain Solver
- CST2013: Import ODB++ Files
- CST2013: Settings for Floquet B