- 易迪拓培训,专注于微波、射频、天线设计工程师的培养
CST2013: Create an Arc
录入:edatop.com 点击:
 Modeling: Curves
 CurvesArc
In this dialog box you may specify the dimensions of an arc either numerically or by using expressions. The construction will always be performed in the currently active coordinate system.
Each arc will be assigned to a curve.
Within its curve each item is identified by a unique name. The curve item can be addressed by this name for subsequent editing operations.
As soon as the curve item is defined it will appear in the main plot window and on the navigation tree.
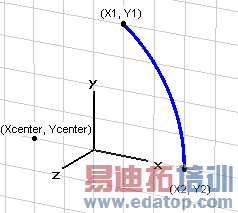
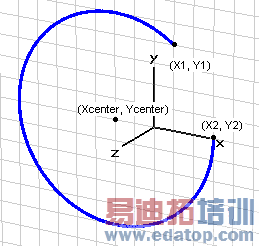
The picture below shows two arcs defined in global coordinates:
|
|
Arc clockwise.
| Arc counterclockwise. |
Name
Specify the unique name for the arc.
Xcenter, Ycenter
Specify valid expressions for the center of the arc in global coordinates. Please note that these entries only appear when the global coordinate system is currently active.
Ucenter, Vcenter
Specify valid expressions for the center of the arc in local coordinates. Please note that these entries only appear when a local coordinate system is currently active.
X1, Y1
Specify valid expressions for the start point of the arc in global coordinates. This point also defines the radius of the arc. Please note that these entries only appear when the global coordinate system is currently active.
U1, V1
Specify valid expressions for the start point of the arc in local coordinates. This point also defines the radius of the arc. Please note that these entries only appear when a local coordinate system is currently active.
X2, Y2
Specify valid expressions for the end point of the arc in global coordinates. This point will be projected to the circle, because the radius is already defined by point (X1, Y1). Please note that these entries only appear when the global coordinate system is currently active.
U2, V2
Specify valid expressions for the end point of the arc in local coordinates. This point will be projected to the circle, because the radius is already defined by point (U1, V1). Please note that these entries only appear when a local coordinate system is currently active.
Edit angle
If this box is checked, you may specify a valid expression for the inner angle of the arc. The values of X2,Y2 (U2,V2) won't be changed and are not used unless you uncheck the checkbox.
Segments
Specify a valid integer expression for the segmentation of the arc.
Curve
Select the curve to which this arc item will be assigned from the list of previously defined curves or enter a new name.
OK
Press this button to finally create the arc.
Preview
Press this button to create a preview image of the arc. This option is very useful to check the settings before you actually create the arc.
Cancel
Closes this dialog box without performing any further action.
Help
Shows this help text.
CST微波工作室培训课程套装,专家讲解,视频教学,帮助您快速学习掌握CST设计应用
上一篇:CST2013: Import ODB++ Files
下一篇:CST2013: Change Folder/Component
CST培训课程推荐详情>>
 最全面、最专业的CST微波工作室视频培训课程,可以帮助您从零开始,全面系统学习CST的设计应用【More..】
频道总排行
- CST2013: Mesh Problem Handling
- CST2013: Field Source Overview
- CST2013: Discrete Port Overview
- CST2013: Sources and Boundary C
- CST2013: Multipin Port Overview
- CST2013: Farfield Overview
- CST2013: Waveguide Port
- CST2013: Frequency Domain Solver
- CST2013: Import ODB++ Files
- CST2013: Settings for Floquet B